Tuesday, February 28, 2012

Somerset County Maple Products


I am excited to show you that we have added some new Somerset County Maple Products to our already extensive line of Somerset County products!  I know it sounds like I repeated myself a lot there...I guess I did.  We have carried an excellent line of real Maple Syrup for years.  But we liked the way Paul Bunyan was packaging their maple products.  Many folks stop and buy Somerset County Maple Syrup for gifts for friends or travelers buy them as a memento of their time in Somerset County.   Regardless of the reason, we thought the Paul Bunyan line would be perfect for our market and we are excited to share it with you.

I found this recipe on their website and hope you will give their products a try.  We will be sampling their Maple Cream this Thursday at the store.  Stop by and try some!  Bet you leave with a jar!


Taken from Paul Bunyan's website:


Maple Crunch Muffin

2 cups all-purpose flour
1 cup whole wheat flour
1/2 cup granola with almonds
1 Tbsp. baking powder
1 tsp. salt
1 cup milk
1 cup pure maple syrup
1/2 cup canola oil
2 eggs, lightly beaten
1 recipe Maple Frosting, recipe below Granola with almonds 

1. Preheat oven to 375 degrees F. Grease eighteen 3-1/2-inch muffin cups with 5x5-inch squares of parchment paper (pleat to fit) or paper bake cups. Combine flours, granola, baking powder and 1 teaspoon salt. Combine milk, syrup, oil, and eggs; add to flour mixture. Stir until moistened (batter will be lumpy). Spoon into muffin cups, filling each two-thirds full. Bake 15 minutes or until a wooden toothpick comes out clean. Cool in muffin cups on wire rack 5 minutes. Remove from cups. Spoon Maple Frosting atop muffins; sprinkle with additional granola. Makes 18 muffins.
Maple Frosting: In bowl beat 2 ounces softened cream cheese 30 seconds. Add 2 tablespoons powdered sugar and 1 tablespoon maple syrup; beat until smooth.

Or instead of using Maple Frosting, Paul Bunyan's Maple Cream could be used 

3. To give as gift, store cooled muffins in an airtight container. Package Maple frosting and granola for topping separately; store in refrigerator.
nutrition facts Calories 247, Total Fat (g)10, Saturated Fat (g)1, Monounsaturated Fat (g)5,Polyunsaturated Fat (g)2, Cholesterol (mg)27, Sodium (mg)219, Carbohydrate (g)36,Total Sugar (g)15, Fiber (g)2, Protein (g)5, Calcium (DV%)10, Iron (DV%)10, Percent Daily Values are based on a 2,000 calorie diet 


Monday, February 27, 2012

Easy Peasy!

Last fall our last son left for college.  Gotta say, I took it hard.  I found myself with time on my hands and an empty house.  About a month after the last one left, Don and I were sitting staring at each other one evening and I said, "We are the two most boring people on the planet."   I have sort of found my groove lately.  Photography is taking up the main part of my time, but the one thing that has certainly gone by the wayside is my cooking skills.  I just don't feel like spending all that time in the kitchen making all of that food. Don (the other half of the boring couple) and I have found that we really enjoy eating lighter.

Sometime in the fall I really began focusing on having fresh salads and fruit cups ready for customers in the morning to be eaten at lunch and ready for our customers to grab on their way home from work.
Check out this picture:


That is dinner tonight!  Both plates of salad came out of that one small take out container in the back of the picture.  I added the ham and the cheese and that was dinner.  I had the one on the right and The Donald had the one on the left!  I feel totally satisfied and full.  I had two dishes to wash and we were finished in a flash.

Here is the best part.  The retail sticker on that salad was......(drum roll).....$2.12!  Now remember, I did add the ham and cheese, which we alter the cost.  But if you stop at Cascio's on your way to work and grab a salad, you will have lunch for two days or share with a friend.  You can do that math....can't you? I will help you...that is 1.06 for your lunch!  Oh, and we will give you the dressing.

The fruit cups and salads are doing very well.  But I thought they deserved their own blog.  I love this.  I might be lazy.....or maybe I am just efficient!  Yeah....I will go with that one.


Saturday, February 25, 2012

Honey & Pecan-Glazed Salmon

This recipe is taken from the Weight Watchers cookbook.  I thought it seemed perfect for Lent.
Enjoy!


1/4 c. honey
4 t. finely chopped pecans
1 T. soy sauce
4 (6 oz) salmon fillets
1/4 t. salt
1/4 t. black pepper

1. Preheat oven to 425 degrees.
2. Combine first three ingredients in a large zip-top bag. Sprinkle fish with salt and pepper; add to bag and seal. Marinate in refrigerator at least 15 minutes. I like to marinate mine all day so all that flavor gets infused.
3. Remove fish and nuts from bad, reserving marinade. Place fish on foil lined pan and top with nuts.
4. Bake at 425 degrees for 15 minutes or until fish flakes easily with a fork, basting fish twice with reserved marinade while baking.

*Cascio's carries an excellent line of Salmon fillets that would be perfect with this recipe.  

Tuesday, February 21, 2012

A Fat Tuesday Treat - Sweet Freedom; Living Allergen Free

Thanks Dawn for another addition to the Sweet Freedom; Living Allergen Free Series!
I had a chance to actually eat these sweet treats last night and I can assure you this recipe is worth your time, gluten free or not.  
ENJOY!


If you've been to New Orleans then you probably stopped at Cafe Du Monde for a sampling of their strong French coffee with chicory and of course....a beignet.  These delicious bites of dough are quickly fried then sprinkled with a healthy dose of powdered sugar and served pipping hot.  Several years ago, before going gluten free, I was lucky enough to find out just how yummy these were for myself.  I always remember them around this time of the year and have often wished I could eat them again.  Imagine my delight when I found a recipe for a gluten free version of these Louisiana staples!  I never share a recipe with you that I don't personally endorse, so of course I mixed up a batch.  After sharing them with both my husband and Bible study group, this tasty recipe receives two thumbs up!  Mix a batch up today before you do something crazy like giving up sweets for lent!


New Orleans Beignets

1 cup warm water (110° F)
1/4 cup granulated cane sugar
1 package rapid rise yeast
1 large egg
1/2 cup evaporated milk (dairy or see directions below for non-dairy)
3 3/4 cup Gluten Free flour mix
1/2 tsp. salt
2 Tbs. shortening
vegetable oil for frying
confectioners sugar to dust Beignets


Combine the warm water, sugar and yeast; stir and set aside to activate the yeast. Allow mixture to sit until it becomes frothy, at least 5 minutes. Meanwhile, beat together the egg and milk. Add 1 cup of the Gluten Free and the salt. Beat until integrated. Cut the shortening into small chunks and mix in with the 1 cup flour, egg and milk. Slowly beat in remaining flour and the proofed yeast mixture until completely mixed. The dough should not be stiff or sticky at this point.

Turn the dough out onto a clean surface or pastry mat dusted with Jules Gluten Free All Purpose Flour. Roll gently into a 1/2-inch thick rectangle. Using a large, sharp knife, cut strips of dough 2 inches wide, on a diagonal (not straight up and down, leaving a diagonal edge to the strips). Cut across these strips in the same way, creating diamond-shaped Beignets. Leave any scraps of dough to test the temperature of the oil do not knead together and cut again. Place cut Beignets onto a parchment-lined baking sheet and cover loosely with a damp towel. Allow to rise in a warming drawer or an oven brought to 200° F, then turned off. The Beignets will roughly double in size after rising for 50 90 minutes (Ive left them covered overnight to rise as well, and they turned out great!)

After the Beignets have risen, pour vegetable oil (high heat, preferably) into a large saucepan to a depth of 2-3 inches. Heat the oil on medium-high to 310° 360° F. Test the temperature of the oil by using any risen scraps of dough remaining. Gently submerge a piece of dough in oil if it rises to the top of the oil immediately and begins to bubble, the oil is hot enough; if it does not rise to the top of the oil, it is not hot enough. If the dough turns dark brown within 30 seconds of being submerged, the oil is too hot.

Once the oil is to temperature, gently submerge 2 3 Beignets in hot oil and cook until lightly browned and puffed on each side approximately 1- 2 minutes only. Remove with a skimmer or slotted spoon to drain on paper towels, and sprinkle confectioners sugar liberally over top of each Beignet. Serve warm.

Yield: approximately 15 Beignets.

Directions for Non-Dairy Evaporated Milk:
Measure 1 cup non-dairy milk of choice and pour into a small saucepan. Over low-medium heat, stir milk occasionally to prevent a skin from forming or the milk from sticking to the pan. Heat until the milk is reduced by half to measure 1/2 cup of liquid (allow approximately 30 minutes for this process). Once reduced, remove from heat and allow to cool slightly before adding to dough per recipe.

Monday, February 20, 2012

The Candle Pasta - Tuscan Corner


Another installment from Jane's Tuscan Corner series!  Remember, Jane lives in Ohio so she doesn't have access to Cascio's but the items she mentions are available at Cascio's.  Do try Jane's recipes, you won't be disappointed. Thanks Jane!


I was scanning the aisles of a favorite little Italian market near Akron last week when I spied a (new to me) pasta called Candele. They resembled giant mustaciole noodles which I grew up eating. Of course I began thinking about how I could incorporate this pasta into a blog recipe. Much to my chagrin, the little Italian lady behind the counter was as clueless as I was about these super sized noodles. She had never prepared them either.

I showed them to my shopping buddies and like a bunch of twitter crazed teens, out came our smart phones. Pronounced con-DAY-lay, the word literally means candle. The pasta is a very long, hollow tube, the length of a typical taper candle. Believe it or not, there were not many ideas in cyber land for how to best prepare this pasta. However one blogger suggested stuffing it with asparagus and topping with a shredded goat gouda cheese. The noodles were the perfect vessel in which to stuff an asparagus chute.


There is no recipe per se for this as I was stumbling in the dark with only a few suggestions on how to prepare this meal. The rest was up to me. But you will need the following:

1 pound of candele pasta
large bunch of asparagus (thin stalks)
olive oil for sautéing asparagus
a cup of grated goat cheese gouda (different from goat cheese, much milder and firmer)
Italian herbs
salt and pepper to taste

SAUCE:

4-6 plum tomatoes
two cans of tomato paste
1.5 cups of red wine
3-4 cloves of garlic, chopped
Italian herbs
salt and pepper to taste
dash of sugar to sweeten to cut the acidity
water if and as needed to dilute sauce
olive oil to saute garlic and tomatoes

This sauce is a heavier red sauce than I usually prefer. But I thought the asparagus could handle it. If you enjoy a lighter, milder sauce, cut back or eliminate the tomato paste and substitute a white wine for the red. I start by sautéing the garlic in olive oil over low heat, then I add chopped tomatoes. Add a little wine and a little water. Allow to “cook down” until the tomatoes can be easily smashed. Season with herbs, salt and pepper. Add the tomato paste a little at a time. Add the rest of wine and more water if necessary. Simmer on low heat for about an hour. I always add a little sugar at the end (one to two tablespoons or to taste) to cut the acidity of the tomatoes.

Sauté the asparagus on low heat in the olive oil until just tender. Add a splash of water if necessary. Season with salt, pepper and Italian herbs to taste. Remove from heat and allow to cool.

Simultaneously prepare the noodles in boiling water but remove them while still slightly firm (a little less cooked than al dente). Drain the pasta and stuff them with cooked asparagus.

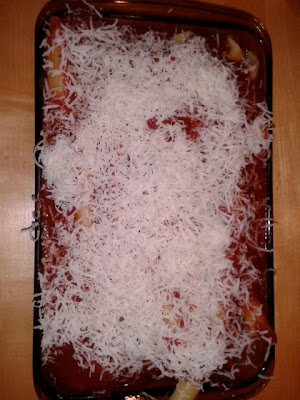
Cover the bottom of a baking dish with a thin layer of tomato sauce. Layer the stuffed candele over the bottom of the dish. Cover with another thin layer of sauce and add some grated goat gouda cheese (think of lasagna). Continue to layer and finish off with a final layer of sauce and cheese.

Bake in an oven at 350 degrees for about 45 minutes. Serve with a salad and Italian bread!

If anyone has ever prepared this pasta and has a better recipe, I’d really enjoy the feedback. I hope you enjoy it!


Thursday, February 16, 2012

A new kinda club....


I am trying to remember exactly how it got started.........hmmmm.....did I call Sally or did Sally call Kami or did I run into Jennifer.....I can't exactly remember......


Wait, I am getting too far ahead of the story!  Let me start at the very beginning.  You see I joined Facebook.......no, that is too far back........Okay I will try again...


Ugh!  I don't know how to tell you about the really fun, really cool, really neat cooking group that has formed here in Somerset.  That is what I am trying to blog about but all sorts of thoughts are running through my head and like I frequently say to my mother when she is telling me a story and it gets slightly off track (well way way way more than slightly.........but I digress) give me wings to get to the point!  


Here is the point, Somerset has a new cooking group.  Yep, there I said it and it is out there.  We do, we have a new cooking club and it formed as a result of a cooking group that was created by Kami Hearn on Facebook quite a while ago.  


Kami loves to cook, really cook, like no Hot Pockets cook. She is a good cook and she cooks wonderful meals for her two darling kids.  I know this because Kami is a good customer.  She comes to Cascio's frequently and she will engage you in a conversation about food quicker then you can say broccoli!  Well Kami added her aunt Jennifer Greig and Jennifer loves to cook too.  She has a recipe for everything.  Want to know how to do something, ask Jennifer. She amazes me.   Then there is Sally Manges.  Sally....well Sally is sort of a legend in our own little town.  She is an important part of the Somerset Hospital landscape and man can she cook too!  I know this because she is one of the members of the cooking group that Kami started on Facebook and Sally too is an excellent Cascio's customer.


Well this one day when this lady meet this.....wait that is the theme to the Brady Bunch.....well this one day Sally, Jennifer, Kami and Jodi (me!) all put our heads together and thought it would be fun if we actually physically meet and put together a club for all of the ladies (and gentlemen) who come together in the Facebook room and chat about food.  What if we meet somewhere, in person, and talked and ate and learned?  What if......well what if a real food club was born?  


It did!  The first meeting was the end of January and what started out as just four girls who wanted to see if anyone else wanted to get together and learn soon found out that yes indeed lots of ladies (and gentlemen) did want to do that and at the very first meeting in January 35+ folks did come!  (Too long of a sentence, not enough punctuation...but I digress)  Great success!


So a club is formed/forming.  We will meet the 1st Tuesday of every month and for right now Laurel Arts has graciously agreed to allow us to meet at the Dressler Center.  The very first meeting was Stewart Ireland from Crazy Alice's Cafe and he did a program on soup stock.  As luck would have it, I had another commitment that night and couldn't go and from what I understand it was my loss!  Can you say "Rave Reviews?"  Yes, the program and the first program got rave reviews.  Sally, Jennifer and Kami were over the moon excited. I was just sorely disappointed I had to miss the first meeting. 


But I get a second chance as the next meeting is March 6th at 6:30 p.m. and will feature a program by:


Elena Gary, RD, Diabetes Education Coordinator, Somerset Hospital.

 Topic: From Planning to Clean-up: Be A Cook in Control.


So if you want to learn about planning your meals and eating healthy and do you want to have a really fun evening? Then plan to join us.  We have had a ton of fun planning the club, reading the suggestions of the folks who attended the first meeting and just basically figuring out how to get a club off the ground. 

Please plan on coming!  We have worked hard (well maybe, but it doesn't feel like work) and we really want to create a group that will help each other learn shortcuts and new ways to prepare food and how to have really healthy and fun meals for your family.  

Bottom line, we want you to come!  Need more information?  Call me at Cascio's, I will do what I can to answer your questions.  445-4852  


Monday, February 13, 2012

Happy Valentine's Day


Today (2-13) was just the beginning.  The Valentine's massacre.....ugh..... I mean holiday has begun.  We started putting chocolate on every strawberry we could find in the store at approximately 7:00 a.m this morning.  Two people dipping and one person boxing and two people waiting on customers and one person attached to the phones.

Every other phone call started like this.......

Me:  "Good morning Cascio's...this is Jodi."
Caller:  (male voice, panicked tone) "Hey I just remembered tomorrow is Valentine's Day and I need something.  You still making those strawberry things with the chocolate?"
Me:  "Yes we are."
Caller:  "Well I gotta get something or I am in big trouble. I better get two dozen just to be sure."
Me:  "Okay, sir.  How soon did you want to pick those up?"
Caller: "I am in your parking lot."

Tomorrow is the actual holiday.  Most men will wake up and their wives will present them with a lovely card at breakfast.....I can only imagine the panic that will ensure about 8 a.m. tomorrow morning.

In case I am too tired to type this tomorrow.......Happy Valentine's Day.

Wednesday, February 8, 2012

Bread of Life - Sweet Freedom: Living Allergen Free


Another installment in Dawn Kiehl-Beals Sweet Freedom:  Living Allergen Free Series.
Enjoy!


Bread is one of the main staples of diets all around the world.  It comes in a variety of textures, favors and types such as roti, naan, focaccia, fry bread and whole grain.  But no matter what name it goes under, the mere mention of the word sets your mouth watering.  A warm soft center surrounded by an aromatic, crunchy crust, slathered in butter and jams, umm!  Who can resist?  Obviously not many of us in the U.S.  I found some fun statistics about our love affair with bread:

Retail sales of fresh breads, buns, and rolls in the U.S. total more than $17 billion annually.
In 2003, U. S. sandwich sales were estimated at $105 billion.
Americans eat 45 billion sandwiches every year.
According to the Great Food Almanac, the average American student will have consumed approximately 1,500 peanut butter and jelly sandwiches upon graduation from high school.
Sandwiches can be nutrition powerhouses. Because bread is made up of primarily complex carbohydrates and very little fat, it provides lots of energy for fewer calories than fatty foods.
Bread is a great source of energy because it is rich in complex carbohydrates.
The soluble fiber in bread can help lower blood cholesterol, which reduces the risk of heart disease.

The Bible also talks about bread.  Luke 11:2-3 says, "And he said unto them, 'When ye pray, say...give us day by day our daily bread'."
And John 6:35 says, "Then Jesus declared, 'I am the bread of life. He who comes to me will never go hungry, and he who believes in me will never be thirsty'."

I believe that Jesus provides food for our souls, but as one who has to follow a gluten free diet, sometimes I just want a hot slice of "my daily bread".  I've tried lots of recipes but most have been tasteless, crumbly or hard as a rock.  However, I finally found a gluten free recipe for French Bread that even leaves my gluten loving friends asking for more.  Before I share the recipe, here are some tips I've discovered.

Equipment
You are going to need a mixer it is going to do pretty much all the work for you.  You also need a French bread pan gluten free bread needs support when it is rising and baking.  The pans come either perforated or solid and both work well.  And finally, unless you are dead certain your oven is totally accurate, run over to the hardware or grocery store and grab an oven thermometer.

Kneading
Gluten free bread doesn't require any kneading!  3 minutes in the mixer and thats pretty much it.

Yeast
I get the best result from Dry Active Yeast. It needs to be active so if you have had a jar sitting in your fridge since you cant remember when, go get a new one it lasts about 6 months refrigerated, after that it may not be good any longer. If you do store your yeast in the fridge then it will take longer for the yeast to proof. You want the yeast mixture to pretty much double in size and be all foamy.

Flours
Choose your favorite GF premixed flour mix or mix together the individual GF flours listed in the recipe below.

Gum and Fat
Mixing the xanthan gum with the fat (olive oil) before adding it to the batter makes it work better.

Prep
Get all your ingredients out, mix your yeast, blend the xanthan gum with the oil and lightly beat your eggs before you start to mix, it makes it easier. Do the steps in order as I give you in the recipe.

The Dough
If you were used to bread making in a former pre-gluten-free life you will think there is not enough flour in the dough because it has a consistency more like a thick batter than dough. Resist with every fiber of your being from adding more flour! This is just the way gluten free bread dough is. You need to spoon the dough into the pans and shape it with a spatula it wont magically turn into pretty ovals unless you do this.

Slashing the Dough
Cutting 3 or 4 diagonal slashes into the top of the dough will help the steam escape while it is baking giving you a lovely, tender texture.

Prepping the Pans
Either spray your French Bread pans with gluten-free, non-stick cooking spray or brush with oil before putting the dough into the pans to rise. For a really authentic bottom, sprinkle a teaspoon of cornmeal on the bottom of the pans after you oil them.  If using the perforated pans, place them on top of a baking sheet to oil and dust with cornmeal.  Do not bake the bread on the baking sheet however, just put the French bread pan right on the oven rack.

Browning
To get the perfect brown what I found gave the best color came from brushing the loaves with melted butter or a dairy free butter replacement just before baking.

Humidity
To get that crunchy crust and tender inside so characteristic of good French Bread it should bake in a humid environment. This is easily created by putting a pan of hot water into the oven while it preheats and just leaving it there while the bread bakes.
Gluten Free French Bread

Ingredients

2 tablespoons Dry Active Yeast
2 teaspoons sugar
1½ cups warm water (it should be pretty warm to the touch but not hot)
3 teaspoons xanthan gum
2 tablespoons olive oil
*1½ cups super fine or Asian white rice flour
*½ cup superfine or Asian sweet rice flour
*1 cup tapioca starch
1½ teaspoons kosher or fine sea salt
2 large eggs, lightly beaten
1 teaspoon apple cider vinegar
2 teaspoons cornmeal optional
2 tablespoons butter or Earth Balance, melted

*in place of the flours and starch you can use 3 cups of a good, pastry quality gluten free flour blend

Directions

Combine the yeast, sugar and warm water in a bowl about twice the size of the mixture and whisk to dissolve the sugar. Let sit for 5 -6 minutes (10 if the yeast has been in the fridge) or until it is foamy and doubled in size.

In a small bowl stir the xanthan gum with the olive oil until the xanthan gum is dissolved.

Combine the flours, tapioca starch (or gluten free flour blend) and salt in the bowl of a mixer fitted with a whisk attachment (or just the regular beaters dont use a dough hook) and mix to combine. Add the yeast mixture, xanthan gum mixture, eggs and vinegar and mix on low to combine. Scrap down the sides of the bowl once. Turn the mixer to high and mix for 3 minutes.

Spray a French bread pan (with 2 forms) with gluten-free, non-stick cooking spray or brush with more olive oil and sprinkle a teaspoon of cornmeal onto the bottom of each pan.

Spoon the batter into the forms and shape into an oval with a spatula. Using a razor blade or sharp knife cut 3 or 4 diagonal slashes on top of each loaf. Cover the loaves with a clean kitchen towel and set in a warm, draft-free place to rise. Let rise for 30 minutes or until the loaves have doubled in size.

Place a baking pan on the floor of your oven (or on the bottom shelf) and fill it with about an inch of really hot water. Position the rack you are baking the bread on in the middle of the oven. Turn the oven on and preheat to 400 degrees.

Brush the top of the loaves with the melted butter or Earth Balance and bake for 40 45 minutes or until the loaves are golden brown and sound hollow when tapped. Let cool in the pan for 5 minutes then remove to a wire rack to finish cooling.

You can also make crusty rolls by scooping the dough into 2 standard sized muffin tins, letting them rise 30 minutes and baking for about 20 minutes.

A gluten free recipe that makes 2 loaves of French Bread or 24 Crusty Rolls.


Friday, February 3, 2012

Winter Vegetable Tart - Tuscan Corner


Another installment in Jane Adam's Tuscan Corner Series.  
Enjoy!


Here we are in the dreary doldrums of February. That limbo, post-holiday season where fun and frazzle ends and the blues and blahs begin. Even the weather has been too pathetic to work up a good schedule altering snow storm. It is here that we sit among our partially broken resolutions to exercise, eat better and live a healthier lifestyle while waiting for spring. I’m plodding through, but I am a little depressed.

Though it’s still in its infancy, I had such high hopes for 2012. This being my 50th year on earth, I was determined to tackle it with a renewed enthusiasm. In addition to all of the above “standard” resolutions, I signed up for a painting class, enrolled in a Bible study and promised myself I’d do better at this blogging thing. I was also sure that our house which has been under contract for 10 months with a contingency would finally come to a close and we’d be moving. But the painting class has been disappointing, the Bible study a tad too rigid, and my house is no closer to closing than Rick Santorum is to moving into the White House. I’ve even missed a blog or two; however I had a good excuse last week. I had (whispering) a colonoscopy! Yes, the dreaded rite of passage of the fifth decade.

I am the wimp of medical procedures; I close my eyes to have blood drawn. I even get a little panicky when my blood pressure is taken. But I’m here to say, this procedure was a breeze. Even the dreaded prep was tolerable. Wearing a tacky surgical gown was indeed humiliating, but the sedatives soon subdued my vanity. BONUS: I got to keep the purple non-slip socks! Ladies (and gents) if you’ve made up excuses as to why you’re not getting this screening test done, let the socks be your motivation!

So am I that depressed that I had to find my inspiration in a colonoscopy? No, but it is a great segue to kale. No vegetable is more valuable to colon health than kale, the best food source of lutein. Lutein protects against colon cancer in both men and women. Kale also provides a whopping 89% of your daily vitamin C requirement. Vitamin C is associated with a reduced risk of colon cancer among its many other virtues. Many people don’t eat kale because it is bitter. However, bitter greens are more palatable in the late fall and winter, because they are sweetened by frost!

So without further ado, I give you a colon friendly Tuscan winter vegetable tart! But you’ll have to get your own purple socks so schedule your colonoscopy today!


For the Pastry:  
3 1/2 cups of flour
2 T olive oil
Salt
Water
(or cheat and buy the Pillsbury pre-made pie shells)

Filling:
1 pound of Kale 
2 leeks, finely chopped
2 potatoes, peeled and cubed
3/4 cup of extra virgin olive oil, plus additional to drizzle over crust
1 1/2 cups grated Parmesan
3-4 chopped garlic cloves
Chopped (fresh if possible) herbs to taste (oregano, thyme)

Preheat the oven to 400 degrees.

Make a simple pastry by mixing together the flour, olive oil, salt and enough water to make a dough that can easily be rolled out. Let rest while you prepare the filling.

Wash, trim and chop the Kale (unless you purchased it prepared). In a large skillet, saute the chopped garlic and leeks in a bit of olive oil over medium heat for a few minutes. Add the kale and continue to saute until the kale softens slightly.  Place in a mixing bowl when done. Add the potatoes, oil, herbs and cheese to the bowl and mix well.

Oil a large rectangular jelly roll pan. Roll out the dough so that is is large enough to cover the bottom of the pan with some dough left over the edges to fold back over the vegetables (the top crust does not have to entirely cover the vegetables). Place the dough in the pan, fill with prepared vegetables and fold over the dough forming top crust. Prick a few holes in the crust with a fork and drizzle with olive oil.*

Bake for 30-40 minutes, until top is golden brown.

*I used two Pillsbury pie crusts, placed one crust in a glass pie dish and filled with the vegetables. I covered with second shell, trimming and pinching the edges.

I have seen variations to this recipe which I have not tried. 1 cup of Ricotta cheese may be added to the vegetable mixture. Additionally a cup of cubed butternut squash can be added in exchange for a little less kale.


Thursday, February 2, 2012

Chocolate Covered Strawberry Joy!


I now totally understand what it would be like to work at the Dairy Queen.  You know how you   stand at the counter of a Dairy Queen and look at all of the ice cream treats and wrestle with which one you are going to order?  Each one sounds great. Do you get the Buster Bar or a hot fudge sundae?  Oh, if you could just have both.  The whole time you are wrestling with this decision, the fifteen year old who is waiting on you has a slightly nauseated look on her face. I now understand this whole scenario only too well.  Here is the back story....


About four years ago, I started to make chocolate covered strawberries for my family.  I would take trays of them to family gatherings and parties.  They were a huge hit.  At one of those events my aunt off-handedly mentioned that she thought customers would buy them.  The thought had not crossed my mind.  But I began to wonder if our customers really would buy them.  We always put our fudge case away right after Christmas and it basically sat on the shelf and gathered dust until the next Thanksgiving.  It would easily hold a few chocolate covered strawberries and showcase them right there on the counter.....but would people buy them?  


I did some research on the internet and found scary prices for chocolate covered strawberries. I knew our customers wouldn't pay upwards of 3.00 per strawberry...that was crazy!  But I was in an unique position of being able to go through the strawberry flats and pull out the largest ones and dip them in a really nice chocolate....again the question remained would customers buy them?  


My staff was reluctant.  I think the words, "she is crazy" were whispered behind my back...okay they say this a lot and most of the times it isn't a whisper...but I persevered.  The first day I dipped strawberries and put them in the case they sold at a nice pace.  Maybe she isn't crazy was whispered.....nah, I am flattering myself....they still thought I was crazy.  What they didn't know was we were all about to be very crazy!


We actually began dipping strawberries in January and decided we should advertise them for Valentines Day.  All I can say is Oh My Goodness!  We were totally under prepared for the fire storm that created. We were inundated with orders, customers literally lined the store and out the door all day that year.  We ran at full speed from about five in the morning until we put chocolate on the last strawberry we could find in the store at the end of the day.  I left covered in chocolate from my sleeve to my shoes and I am not kidding.  Diane who has worked for us for quite a few years looked at me and said, "you have now ruined every holiday for me", she now schedules her vacation each year over Valentines day....but I digress... ask me how much I wanted to eat a chocolate covered strawberry at the end of that day?  Not so much.


In fact I rarely eat them,  if ever.  Once you have stood for that many hours and dipped them, smelling the chocolate, you quickly lose your appetite for them.  I can now completely sympathize with all people who work in the ice cream or bakery industry and are surrounded by the smell that we find tempting and delicious.  It really loses it's cache in a hurry.


I can't tell you the last time I have eaten chocolate covered strawberry. I can tell you that our customers tell us they are outstanding. I know we use a wonderful chocolate.  It is a mix of milk and dark, it walks that center line perfectly.  We decorate them with a terrific white chocolate and we box them up for 15.00.  We will deliver them on Valentines Day to your sweetheart in the Somerset area.  We also put them on trays if you want to order them for a party. (445-4852)


We usually stop dipping them by Mother's Day.  The really big strawberries are over by that point and as soon as it starts to get warm out it gets more difficult for customers to keep them looking great and well frankly, it is a good time for us to just stop.  We like to do them as more of seasonal treat.


Call today if you want to order strawberries for your sweetheart for Valentine's Day. Oh and me, I will gear up for another event that will ruin chocolate covered strawberries for me for another year....sigh....